6.10 How to change network settings
An IP address (Internet Protocol Address) is a unique identifier of a device on a network that enables data exchange between computers and other devices on the Internet. Proper configuration of IP addresses is critical for the correct operation of network connections. Configuring network parameters plays an important role in the operation of your services.
Changing network settings for servers provides important flexibility. It gives administrators the ability to adapt server network parameters to meet the requirements of a changed system or to optimize application performance as part of project scaling or infrastructure changes. In this article, we will look at the main steps and tools for changing network settings on the Linux and Windows platforms, which will help you successfully configure the server network according to your needs.
Connecting to the Server
To change network settings, it is recommended to have direct access to the server. For virtual servers you can use the VNC console, and for dedicated servers or colocation servers you will need IP-KVM.
This approach will help avoid errors when changing network parameters, which could cause the server to become inaccessible for remote management or external connections.
For further actions, you will also need network settings, which you can view in the letter about opening the service. Alternatively, you can find them in the customer area, go to the Services section -> Then in the service category, highlight the server with the mouse and click the IP button.
Configuring Linux Network

To begin configuring the network, it is important to determine the Linux distribution installed on the server and the network service used to manage network settings. This will allow you to correctly edit the corresponding configuration files.
Determining the Linux distribution and network service.
1. To find out the current Linux distribution, enter the command:
cat /etc/os-release
It will display information about the operating system, its version, and other details. Example output:
root@hostname ~ # cat /etc/os-release
NAME="Ubuntu"
VERSION="20.04.6 LTS (Focal Fossa)"
ID=ubuntu
ID_LIKE=debian
PRETTY_NAME="Ubuntu 20.04.6 LTS"
VERSION_ID="20.04"
VERSION_CODENAME=focal
2. Next, you need to check which network service is used on the server. It could be:
- netplan (
/etc/netplan/*.yaml) - a general solution for most modern distributions. - ifupdown (
/etc/network/interfaces) – used in Debian, Ubuntu and other Debian-based distributions. - network-scripts (
/etc/sysconfig/network-scripts/) – used in RHEL, CentOS, RockyLinux, AlmaLinux and others.
The easiest way to determine which service is being used is to see if the corresponding configuration files or directories exist:
- If the file
/run/network/ifstateexists and is not empty, then the ifupdown service (/etc/network/interfaces) is used. - If the
/etc/sysconfig/network-scripts/directory is present, then the configuration scripts of this interface are applied. - If there is neither
/run/network/ifstatenor/etc/sysconfig/network-scripts/, then netplan is probably used.
Important: before making changes to the configuration files, it is recommended to create a backup copy of them in case problems arise or you need to roll back the changes.
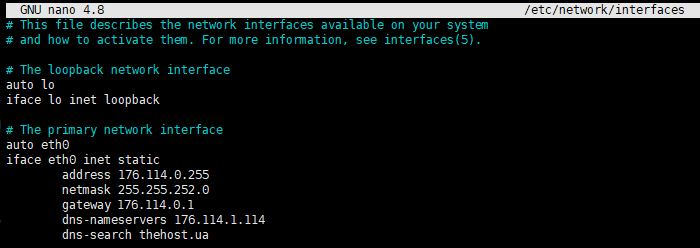
Distributions Debian, Ubuntu

If, when checking the server, you determined that the OS is Debian/Ubuntu. The network interface will be configured using the following algorithm:
1. Open a terminal and log in as root administrator (via sudo or su).
2. Edit the network configuration file, such as /etc/network/interfaces, to set the required IP address, subnet mask, gateway and DNS parameters.
3. Restart the network using one of the following commands for the changes to take effect:
service networking restart
or
systemctl restart networking
In addition, to apply the configuration, you can completely reboot the server using the command:
reboot
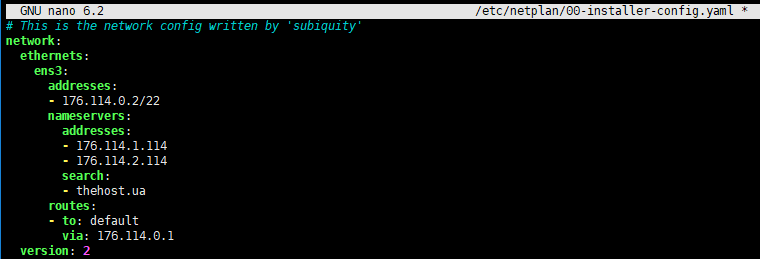
Next, network configuration will be demonstrated using the Netpaln utility.
Note: netplan is a relatively new network management tool that is gradually being introduced into many popular Linux distributions. It provides a single interface for network configuration via YAML files in /etc/netplan/*.yaml. The tool is designed to simplify the setup of complex network configurations.
To configure a network using the netpan network service, follow these steps:
1. Open a terminal and log in as root administrator (via sudo or su).
2. Edit the appropriate network interface configuration file in the /etc/netplan/00-installer-config.yaml directory, usually called interface_number-installer-config.yaml (for example, 00-installer-config.yaml for the standard interface 00).
3. Apply the new network configuration with the command:
netplan apply
In addition, to apply the configuration, you can completely reboot the server using the command:
reboot
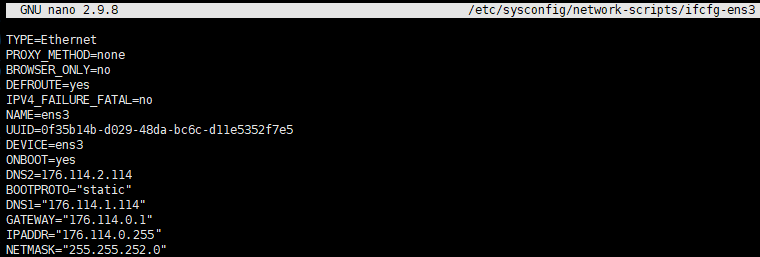
Distributions CentOS, AlmaLinux, RockyLinux

If, when checking the server, you determined that the OS of the RedHat family is used - CentOS, AlmaLinux, RockyLinux. The network interface will be configured using the following algorithm:
Step by step procedure:
1. Open a terminal and log in as root administrator (via sudo or su).
2. Edit the appropriate network interface configuration file in the /etc/sysconfig/network-scripts/ directory, usually called ifcfg-interface_name (for example, ifcfg-ens33 for the ens33 interface).
3. Restart the network using one of the following commands for the changes to take effect:
service networking restart
or
systemctl restart network
In addition, to apply the configuration, you can completely reboot the server using the command:
reboot
Important: if your server uses a control panel (for example, ISPmanager, FastPanel, etc.), the process of changing the IP address becomes more complicated. The control panel configuration has many interconnected components and settings depending on the IP address.
Procedure: if you need to change the network configuration on servers with the ISPmanager 4 Lite/Pro control panel installed.
For our actions, we will use the IP replacement macro in the panel configuration files. The server must have a replace or sed utility. The algorithm below uses the following macros:
- %OLD_IP% - old server IP
- %NEW_IP% - new server IP
1. The first step is to set up the network, the detailed procedure on how to do this has been demonstrated earlier. As a result of correct configuration, you should have access to the server via the SSH terminal.
2. Reboot the server and connect to it via SSH.
3. Using the replace utility we execute the commands:
replace "%OLD_IP%" "%NEW_IP%" -- /etc/rc.local
replace "%OLD_IP%" "%NEW_IP%" -- /etc/bind/*
replace "%OLD_IP%" "%NEW_IP%" -- /etc/nginx/*
replace "%OLD_IP%" "%NEW_IP%" -- /etc/apache2/*
replace "%OLD_IP%" "%NEW_IP%" -- /etc/apache2/mods-available/rpaf.conf
replace "%OLD_IP%" "%NEW_IP%" -- /etc/apache2/mods-available/remoteip.conf
replace "%OLD_IP%" "%NEW_IP%" -- /etc/exim4/*
replace "%OLD_IP%" "%NEW_IP%" -- /usr/local/ispmgr/etc/*
Or, we use the alternative utility sed:
sed -r -i "s/%OLD_IP%/%NEW_IP%/g" /etc/rc.local
sed -r -i "s/%OLD_IP%/%NEW_IP%/g" /etc/bind/*
sed -r -i "s/%OLD_IP%/%NEW_IP%/g" /etc/nginx/*
sed -r -i "s/%OLD_IP%/%NEW_IP%/g" /etc/apache2/*
sed -r -i "s/%OLD_IP%/%NEW_IP%/g" /etc/apache2/mods-available/rpaf.conf
sed -r -i "s/%OLD_IP%/%NEW_IP%/g" /etc/apache2/mods-available/remoteip.conf
sed -r -i "s/%OLD_IP%/%NEW_IP%/g" /etc/exim4/*
sed -r -i "s/%OLD_IP%/%NEW_IP%/g" /usr/local/ispmgr/etc/*
4. We create an updated configuration for the Exim4 mail service:
update-exim4.conf
5. Rebooting the main system services
service exim4 restart
service dovecot restart
service bind9 restart
service apache2 restart
service nginx restart
service monit restart
6. Further actions will require transferring the license to a new IP and then updating the licensing files on the server. Perform this action using support service subscribers.
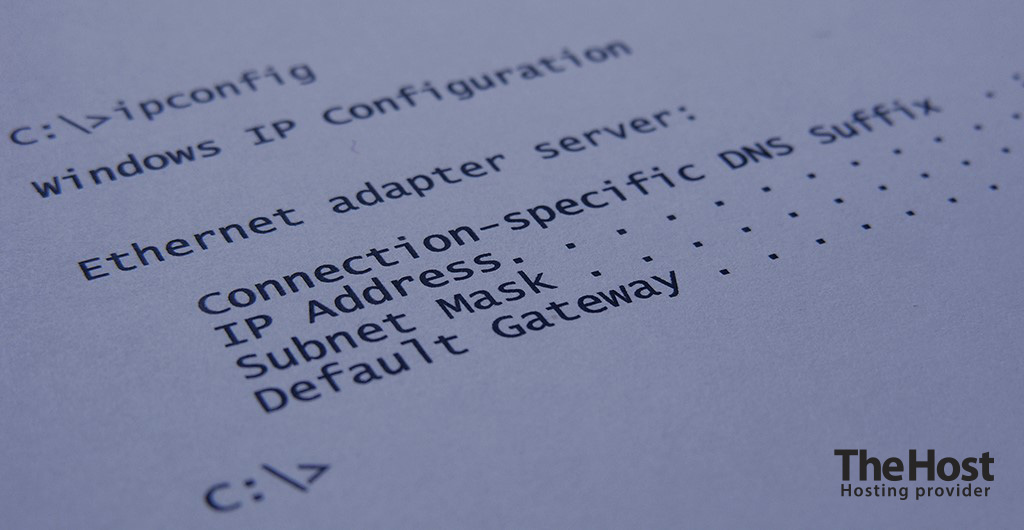
Windows network setup

To ensure that network connections work correctly, it is also important to correctly configure the IP address in Windows operating systems. Users can change the IP address through the network configuration GUI. Step by step procedure:
1. Open Network and Sharing Center using one of the following methods:
- Start -> Control Panel -> Network and Sharing Center.
- Press
Win + R, typencpa.cpland press Enter. - From the Start menu, search for
runand press Enter, then typencpa.cpl.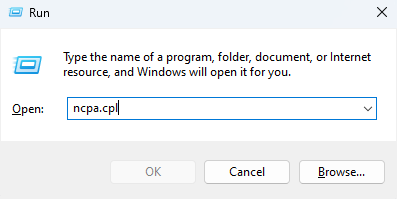
2. Find the desired network connection and right-click to open its properties.
3. Select Internet Protocol Version 4 (TCP/IPv4) or Internet Protocol Version 6 (TCP/IPv6) depending on your network type and click Properties.
4. Select Use the following IP address and enter the new IP address, subnet mask, gateway address and preferred DNS servers, then click OK, to apply the new network settings.

After restarting the network adapter, the computer will use the new static IP address for network connections.
Please note: on servers using User Account Control (UAC), these steps may require running as an administrator (right click Run as administrator).

