6.2.9 Cloning VPS/VDS using a snapshot or backup
Using the VM-Cloud control panel, you can perform server cloning yourself: convert the disk space of the target server into a complete copy of your other server.
This procedure is performed using Import of a backup or snapshot from one server to another.
Attention: The import procedure is irreversible, all current data on the target server will be lost. Of course, if you have already created snapshots or backups on the target server, you can restore old data from them. This way it is possible to “exchange” data between your servers if the need ever arises.
Prerequisites
1. Two or more active virtual servers. One will act as a donor, the others as target.
2. Access to the VM-Cloud panel, in which the administration and management of the virtual machines involved in the operation is carried out
3. Created snapshot or backup donor server. The disk system size of the target server must be equal to or larger than the size of the snapshot/backup disks. The number of disks must also match.
Please note: if a snapshot is used for import, it must be of type remote (remote). The local snapshot type (local) can be converted at any time to a remote snapshot type in the control panel of your VPS/VDS.
Step-by-step instruction
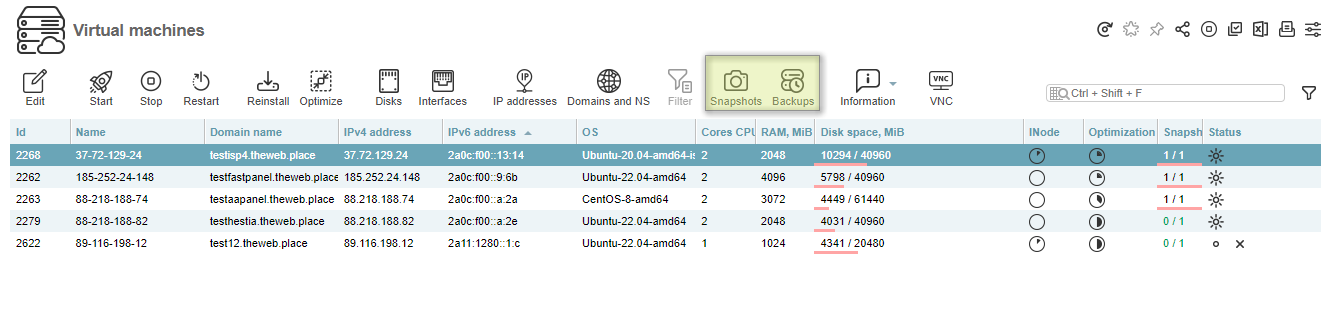
1. Go to the control panel VM-Cloud. Select the donor server with the mouse button and click Snapshots/Backups, depending on the planned medium used to perform the import.
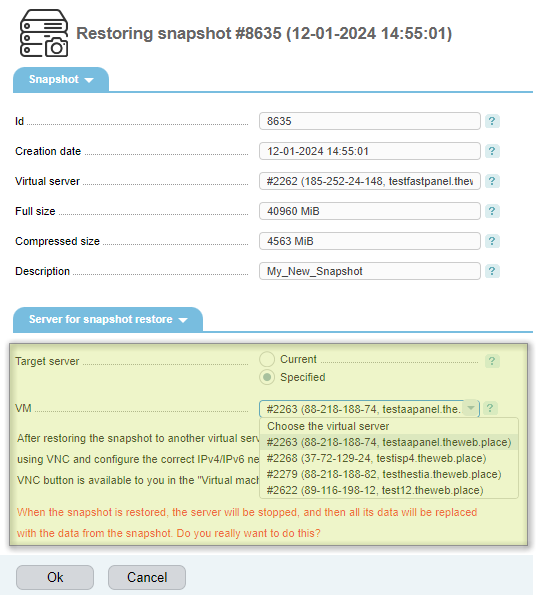
2. In the open window, select the desired snapshot/backup and click Restore.

3. In the open form, change the Target Server setting from Current to Specified. In the column below, select one of your servers to which the data will be imported.
4. Wait until the operation is completed and the recovery report is successful.
Important: After the restoration is completed, the target server will be unavailable on the network! It can be accessed for further settings using VNC.
Post-import Server Configuration
Since the target server has become a complete copy of the donor server, this entails the need for additional work:
-
Network configuration. Our target server now has the network configuration of our donor server, which will definitely lead to network inoperability for the target server. Using remote access via VNC, you need to put the server’s network configuration in order. Examples of how to change the network configuration on different OSes are described in our instructions.
-
Access parameters. After cloning, your access parameters are root, FTP, SSH, etc. will be a complete copy of those on the donor server.
-
Server control panel. If the donor server had a panel like ISPManager4 or FastPanel, its files are successfully imported to the server. But the panel itself will not work - due to the lack of a dedicated license for the IP address of the target server.
Please note: if you cloned a server with ISPManager4, please contact Support to resolve the problem with the IP address license.
-
DNS. Full copies of DNS records from the old server will be created on the target server, if the DNS server was present on it. They will need to be updated. If the DNS pointing to the server was done externally, you will need to change the external records. If new domains are deployed on the cloned server, do not forget to change its IP PTR record.
-
Web server configuration. The NginX/Apache configs will again be a complete copy of those on the donor server. It will be necessary to make changes taking into account the main and additional IP addresses allocated to the target server.
-
Any IP-dependent configurations. Such as Exim, OpenSSH, Postfix, etc.

