6.4.10 Installation and configuration of LAMP
LAMP is a software bundle that represents a popular technology stack for developing and deploying web applications. LAMP is widely used due to its reliability, flexibility, and open-source nature. This acronym stands for:
- L — Linux family operating system.
- A — Apache web server.
- M — MySQL or MariaDB database management system.
- P — PHP programming language for creating web pages.
In this article, we’ll look at the process of installing and configuring LAMP on various Linux distributions, including Debian, Ubuntu, CentOS, AlmaLinux, and RockyLinux.
Important: Before starting the installation, make sure You have superuser (root) rights or the ability to use sudo. It’s also recommended to create a backup of important data before making changes to the system.
We recommend performing all the actions described below on a clean OS image, without pre-installed control panels or other functionality.
Note: instructions have been verified on the following OS versions: Ubuntu 18.04-22.04; Debian 8–12; CentOS 7, 8; AlmaLinux 8, 9. Functionality on later versions is not guaranteed.
Installation for Debian and Ubuntu
1. System update
Before starting the installation, update the package list and the system itself:
- sudo apt update && sudo apt upgrade -y
2. Installing Apache
Install the Apache web server:
- sudo apt install apache2 -y
- sudo systemctl enable apache2
3. Installing MySQL
Install the MySQL server:
- sudo apt install mysql-server -y
- sudo systemctl enable mysql
After installation, run the MySQL secure installation script:
- sudo mysql_secure_installation
Answer the script’s questions, it’s recommended to answer Y to all questions to enhance security:
- Set root password? [Y/n] – Set a password for root if it wasn’t set before.
- Remove anonymous users? [Y/n] – Remove anonymous user.
- Disallow root login remotely? [Y/n] – Prohibit remote login as root.
- Remove test database and access to it? [Y/n] – Remove test database.
- Reload privilege tables now? [Y/n] – Apply changes.
4. Installing PHP
Install PHP and necessary modules. In this example, we’ll use PHP 8.1, but You can replace the version with the one relevant to Your case:
Ubuntu 18.04-22.04 and Debian 9–12: installing PHP 8.1.
To install PHP 8.1 or another needed version, use the PPA repository:
- sudo add-apt-repository ppa:ondrej/php -y
- sudo apt update
Then install PHP and necessary modules:
- sudo apt install php8.1 php8.1-fpm libapache2-mod-php8.1 php8.1-mysql php8.1-common php8.1-cli -y
Debian 8 and older versions: installing PHP 8.1.
To install PHP 8.1 or another needed version, use a third-party repository:
- sudo apt install apt-transport-https lsb-release ca-certificates -y
- sudo wget -qO - https://packages.sury.org/php/apt.gpg | sudo apt-key add -
- echo "deb https://packages.sury.org/php/ $(lsb_release -sc) main" | sudo tee /etc/apt/sources.list.d/php.list
- sudo apt update
Then install PHP and necessary modules:
- sudo apt install php8.1 php8.1-fpm libapache2-mod-php8.1 php8.1-mysql php8.1-common php8.1-cli -y
Note: if You need a different PHP version (for example, PHP 7.4 or PHP 8.2), replace php8.1 with the needed version.
You can check the installed PHP version with the command:
- php -v
The command output will display the installed PHP version:

5. Configuring Apache for PHP
Create a test PHP file:
- echo "<?php phpinfo(); ?>" | sudo tee /var/www/html/phpinfo.php
5. Checking services status
After installing all LAMP components, check their status and make sure they are set to autostart:
- sudo systemctl status apache2 mysql php8.1-fpm
When checking, the status should display with the text active (running) – this will mean that everything was installed correctly.

Make sure all services are added to autostart:
- sudo systemctl enable apache2 mysql php8.1-fpm
6. Configuring firewall for Debian and Ubuntu
If You’re using UFW (Uncomplicated Firewall), allow HTTP and HTTPS traffic:
- sudo ufw allow "Apache Full"
Alternatively: if You plan to work with the IPTables utility.
Execute commands for automatic rule loading:
- sudo apt install iptables-persistent
- systemctl enable netfilter-persistent.service
Then, allow access to HTTP and HTTPS by executing the following commands:
- iptables -I INPUT -p tcp -m tcp --dport 80 -j ACCEPT
- iptables -I INPUT -p tcp -m tcp --dport 443 -j ACCEPT
7. Testing after reboot
To ensure that all LAMP components start automatically after server reboot, perform the following actions:
- sudo reboot
After the server reboots, check the services status:
- sudo systemctl status apache2 mysql php8.1-fpm
When checking, the status should display with the text active (running) – this will mean that everything was installed correctly.
8. Check the web server functionality
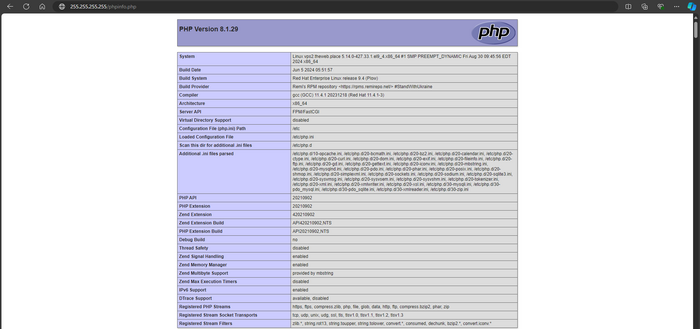
To check PHP operation, check the file created earlier, open it in the browser’s address bar.
http://255.255.255.255/phpinfo.php, where instead of numbers 255 (255.255.255.255) You need to specify the IP that was issued when creating the server.
You can view the IP address in the letter about opening the service.
We inform: the installation has been successfully completed. Now You can upload Your website files to the /var/www/html/ folder
Installation for CentOS, AlmaLinux, and RockyLinux
1. System update
Before starting the installation, update the system:
- sudo dnf update -y
2. Installing Apache
Install the Apache web server:
- sudo dnf install httpd -y
- sudo systemctl start httpd
- sudo systemctl enable httpd
3. Installing MySQL (MariaDB)
Install MariaDB:
- sudo dnf install mariadb-server -y
- sudo systemctl start mariadb
- sudo systemctl enable mariadb
After installation, run the MariaDB secure installation script:
- sudo mysql_secure_installation
Answer the script’s questions, it’s recommended to answer Y to all questions to enhance security:
- Set root password? [Y/n] – Set a password for root if it wasn’t set before.
- Remove anonymous users? [Y/n] – Remove anonymous user.
- Disallow root login remotely? [Y/n] – Prohibit remote login as root.
- Remove test database and access to it? [Y/n] – Remove test database.
- Reload privilege tables now? [Y/n] – Apply changes.
4. Installing PHP
Depending on Your operating system version, execute the appropriate commands to install PHP 8.1.
AlmaLinux 9 and RockyLinux 9: installing PHP 8.1.
For AlmaLinux 9 and RockyLinux 9, execute the following commands:
- sudo dnf install epel-release -y
- sudo dnf install https://rpms.remirepo.net/enterprise/remi-release-9.rpm -y
- sudo dnf module enable php:remi-8.1 -y
- sudo dnf install php php-cli php-common php-fpm php-mysqlnd php-zip php-gd php-mbstring php-curl php-xml php-pear php-bcmath php-json -y
- sudo systemctl restart httpd
CentOS 8, AlmaLinux 8, RockyLinux 8: installing PHP 8.1.
For CentOS 8, AlmaLinux 8, and RockyLinux 8, use dnf and install the repositories:
- sudo dnf install epel-release -y
- sudo dnf install https://rpms.remirepo.net/enterprise/remi-release-8.rpm -y
- sudo dnf module enable php:remi-8.1 -y
- sudo dnf install php php-cli php-common php-fpm php-mysqlnd php-zip php-gd php-mbstring php-curl php-xml php-pear php-bcmath php-json -y
- sudo systemctl restart httpd
CentOS 7: installing PHP 8.1.
For CentOS 7, use yum and install the EPEL and Remi repositories:
- sudo yum install epel-release -y
- sudo yum install https://rpms.remirepo.net/enterprise/remi-release-7.rpm -y
- sudo yum-config-manager --enable remi-php81
- sudo yum install php php-cli php-common php-fpm php-mysqlnd php-zip php-gd php-mbstring php-curl php-xml php-pear php-bcmath php-json -y
- sudo systemctl restart httpd
Note: if You need a different PHP version (for example, PHP 7.4 or PHP 8.2), replace php8.1 with the needed version.
You can check the installed PHP version with the command:
- php -v
The command output will display the installed PHP version:
5. Configuring Apache for PHP
Create a test PHP file:
- echo "<?php phpinfo(); ?>" | sudo tee /var/www/html/phpinfo.php
6. Checking services status
After installing all LAMP components, check their status and make sure they are set to autostart:
- sudo systemctl status httpd mariadb php-fpm
When checking, the status should display with the text active (running) – this will mean that everything was installed correctly.
Make sure all services are added to autostart:
- sudo systemctl enable httpd mariadb php-fpm
7. Configuring firewall for CentOS, AlmaLinux, and RockyLinux
Allow HTTP and HTTPS traffic through the firewall:
- sudo firewall-cmd --permanent --add-service=http
- sudo firewall-cmd --permanent --add-service=https
- sudo firewall-cmd --reload
Alternatively: if You plan to work with the IPTables utility.
- Install
iptables-servicesto ensure automatic rule loading:
- sudo yum install iptables-services
- Enable and start the
iptablesservice:
- sudo systemctl enable iptables
- sudo systemctl start iptables
- Allow access via HTTP and HTTPS using the following commands:
- sudo iptables -I INPUT -p tcp -m tcp --dport 80 -j ACCEPT
- sudo iptables -I INPUT -p tcp -m tcp --dport 443 -j ACCEPT
- Save the
iptablesrules:
- sudo service iptables save
- To ensure that the rules are applied upon reboot, execute:
- sudo systemctl restart iptables
8. Testing after reboot
To ensure that all LAMP components start automatically after server reboot, perform the following actions:
- sudo reboot
After the server reboots, check the services status:
- sudo systemctl status httpd mariadb php-fpm
When checking, the status should display with the text active (running) – this will mean that everything was installed correctly.
9. Check the web server functionality
To check PHP operation, check the file created earlier, open it in the browser’s address bar.
http://255.255.255.255/phpinfo.php, where instead of numbers 255 (255.255.255.255) You need to specify the IP that was issued when creating the server.
You can view the IP address in the letter about opening the service.
We inform: the installation has been successfully completed. Now You can upload Your website files to the /var/www/html/ folder
Security Recommendations
Now You have installed and configured the LAMP stack on Your system. This is a basic configuration that can be further customized for Your project’s specific needs. It is recommended to regularly update LAMP components to ensure security and stability.
We remind You:
after completing the testing, it is recommended to delete the phpinfo.php file, as it may provide potential attackers with information about Your system:
- sudo rm /var/www/html/phpinfo.php
Additionally:
-
Consider changing the standard SSH port (22) to a non-standard one to reduce the number of automated attacks.
-
Use key-based authentication instead of passwords for SSH.
-
Configure fail2ban to protect against brute-force attacks.
-
Regularly check server logs for suspicious activity.
-
Consider using a Web Application Firewall (WAF) for additional protection of web applications.

