3.2.5 Backups. How to Set Up Backup Tasks and Restore a Website from a Backup

Backup is an integral part of data security. Creating backups ensures protection against the loss of valuable files, allowing for their restoration in case of failures, errors, or unexpected situations. In this article, we will explore the process of creating and restoring backups on our hosting platform. This information is also relevant for virtual/dedicated servers with the ISPManager4 panel.
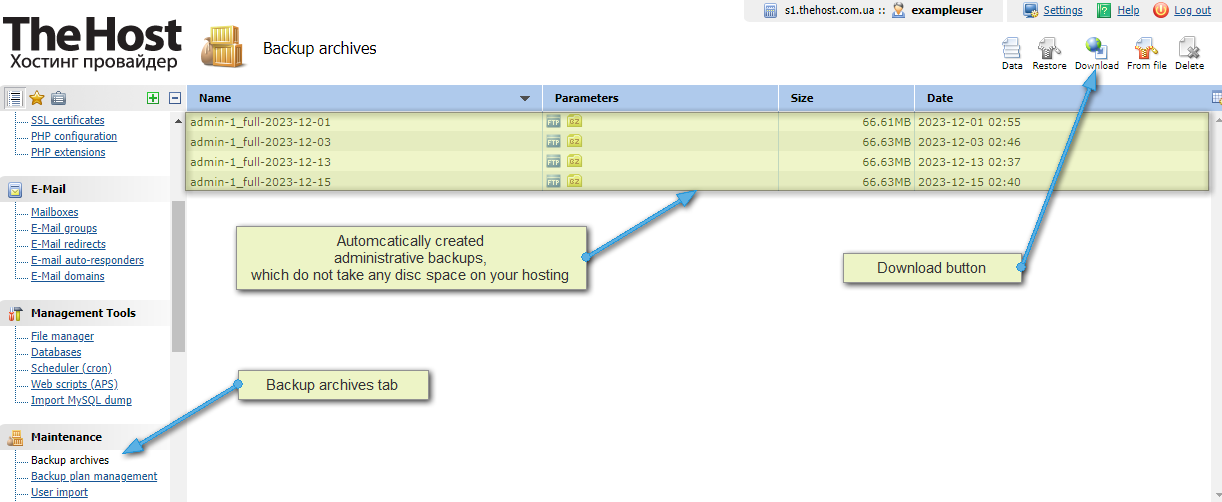
On all shared hosting servers, data backup is performed automatically by the administration’s task. Administrative backups can be viewed in the Backup archives tab and are in the format admin-1_full-date-created. These backups are stored on a different server and do not occupy space on your hosting account. You can always download them to your PC by selecting the appropriate copy and clicking Download. Additionally, they can be used to restore your hosting account or its individual data.
Ond virtual and dedicated servers, administrative copies are not created. Therefore, to ensure the safety of your data, we recommend setting up your own backup task. You can find more detailed information about snapshots and backups for virtual servers here.
Setting up Backup Task in ISPManager4
You can independently configure a backup task in the ISPManager4 panel as follows:
1. Go to the Backup plan management tab. In the top right corner, click the New button.
2. In the open properties window for the future task, you can specify its settings: where to store your backups, which archiver to use, how often and at what time to perform it, and how many backups to keep before deleting/overwriting them. We recommend setting the backup execution time at night when the traffic to your sites is minimal. If desired, you can use the settings from the screenshot below.

Additionaly: what each task setting is responsible for
| Option | Description |
|---|---|
| Plan Name | Name of your task |
| Storage | Determines whether the backup will be stored locally or remotely |
| Local directory | Specifies the path to the directory for storing backups |
| FTP server (remote) | IP or hostname of the remote server |
| Login (remote) | Login of the FTP user on the remote server |
| Password (remote) | Password of the FTP user on the remote server |
| Archiver | The archiver to be used, default is tgz |
| Period | Frequency of task execution |
| Start time | The excact time for task to initialize backup process |
| Daily/Weekly/Monthly archives | Number of archives to be stored on the server for this period before deletion/overwriting |
| Overwrite the existing backup | Whether the last of the stored backups will be overwritten |
| Compression level | Determines the intensity of compression, recommended to leave the default value |
Important: We do not recommend creating tasks with a high number of simultaneously stored archives. This may lead to exceeding the quota for disk space usage or completely filling the disk space of your server, which will have negative consequences for your service.
3. You can also choose which specific data will be archived according to your task. To do this, select the existing task and click the Content button in the upper right corner. In the open window, you can add/remove data subject to backup under your task.
4. The task is created and configured. The next archive will be recorded in the period you specified when creating it. You don’t have to wait for this date; you can start the task execution out of turn. To do this, select it with the mouse and click the Backup button in the upper right corner.
Additionally: how to configure backup storage on a remote server?
To do this, you need to select one of the options Remote FTP Server in the Storage row. In the appeared settings, you need to specify the corresponding FTP access parameters to the remote server in Server, Login, and Password.
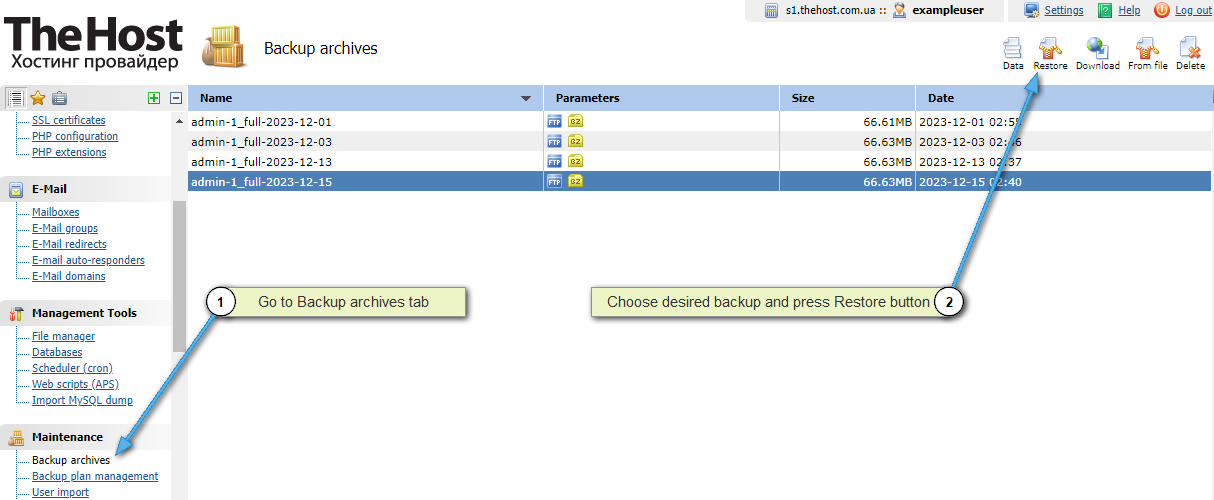
Restoring from Backup
Restoration can be performed both entirely and partially.
If you choose a backup and click Restore, the entire account, all files, databases, and panel settings will be restored to the date when the copy was created.
You can also restore individual elements. If you select the backup and click Content (or double-click with the mouse), the elements of the backup will be opened.
For example, here you can double-click MySQL databases and then restore a specific database. Alternatively, you can go to Files - WWW and then select the folder of a specific site and restore only it. In this way, you can navigate to any folder and restore any individual file. In the screenshot below, only the directory with the files of the site example.theweb.place will be restored.
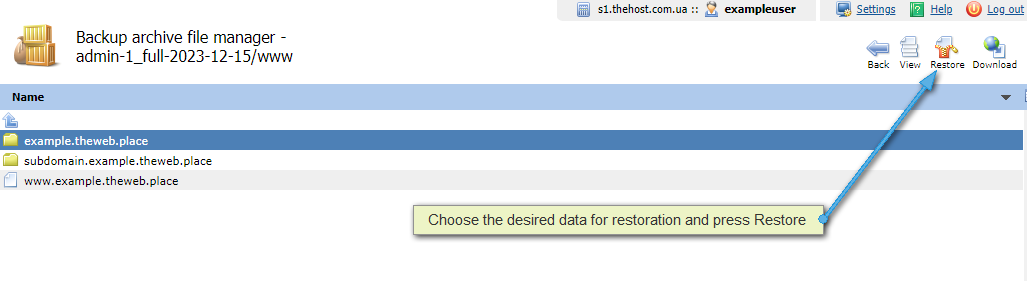
Important: When restoring, data (files, folders, database tables, mailbox contents) from the backup do not overwrite existing items with the same names. Therefore, before restoring, it is recommended to rename/delete the folder of the site or the database being restored.
Note: The restoration procedure (as well as archiving itself) may take a considerable amount of time. This depends on the size of the backup and the number of items stored in it.

