4.2.2 Installing and configuring the Contact Form 7 plugin

WP Contact Form is a popular solution for creating simple and convenient feedback forms on a WordPress website. Its main task is to help your visitors easily contact you: leave a question, request a call back or send a request for services. The principle of operation is simple - the user fills out a form on the site, and the entered data is sent to the email address you specified. Thanks to flexible settings, you can create forms for any purpose: from collecting reviews to registering for events. This is an indispensable tool for any site, be it a personal blog, an online store or a corporate resource.
Preparation
Please note: the Preparation section is relevant only for our clients using the ISPManager4 control panel, on the hosting service or others.
Before configuring the plugin itself, you should perform a number of actions in the control panel. We will show this part using the example of hosting, but it is also relevant for virtual and dedicated servers with the ISPManager4 panel.
1. Go to the hosting control panel.
2. Open the Mailboxes tab and make sure that you have created a mailbox based on your domain, like admin@example.com.ua:

3. We will configure the future contact form so that it first sends a letter to the mail based on your domain. Then it will forward letters to the necessary external mail, for example, to Gmail. To set up such forwarding, open the mailbox properties and enter the desired email in the form Send copies of letters to e-mail:

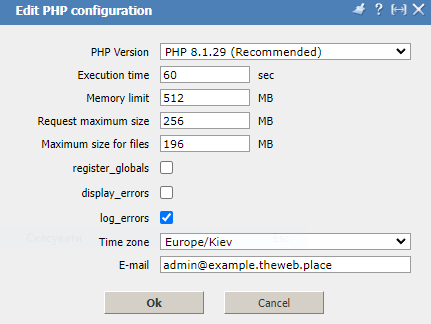
4. Then open the PHP Settings tab in the control panel and make sure that in the E-Mail column you have specified this OR another email based on your domain:

This completes the preparations and you can proceed to installing and configuring the plugin itself.
Installing the plugin
1. Log in to the WordPress admin panel of your site.
2. Go to the Plugins menu and click Add new in the upper left corner:

3. In the search bar, enter Contact Form 7:

4. Find the plugin and click Install and wait for the installation. After it is finished, click the new button in place of the previous one – Activate.
Creating a feedback form
1. After activation, a new section will appear in the admin panel: Contact Form 7 → Contact forms:

2. Go to this section and click Add new:

3. Enter a name for the form (for example, Feedback).
4. A built-in editor will open, in which you need to configure the fields of the future feedback form. For ease of explanation, we will designate the visitor of your site who fills it out as client:

The following fields are created by default, which your client will need to fill out:
- Name;
- E-mail;
- Message subject;
- Message body.
To add new fields (for example, a phone number), use the buttons at the top of the editor. Detailed form customization is a very large topic, which cannot be fit into an introductory article, unfortunately.
Setting up sending to email from a form
You can see how the letter will look like in your email after the client fills in all the data in the Letter tab:

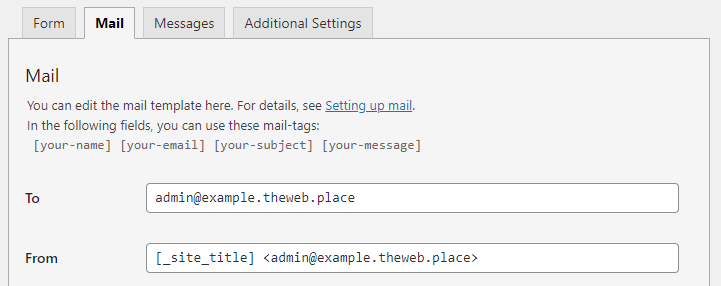
First of all, check the following fields:

- To: specify the email where the messages will be sent. If you are using hosting, this can be an email based on your domain, and from there you can forward the mail further, as described in the first paragraph of the article.
- From: must also contain an email address based on your domain. This is important for the correct operation of the mail.
As a result, we may have a situation where we send mail from the address admin@example.com.ua to the same email address admin@example.com.ua. This is normal, if you set up forwarding, it will work.
The rest of the settings can be left by default or configured if necessary.
After setting up the form, click Save in the upper right corner.
Inserting a form on a website
After saving the form, you will be given a code (for example, contact-form-7 id="123" title="Feedback"). Copy it:

Go to Pages → All pages, select the page where you want to insert the form, or create a new one.
Paste the code into the text field of the page or post:

Then save the changes on the page.
Testing the form
Go to the page with the feedback form on your site after saving its changes or publishing:

As you can see, our test form has been added and exists. Fill in all the fields and send a test message.
After that, the plugin will notify you about the sending result. If everything described above was done correctly, you will see the following standard notification:

Now you can make sure that the letter really arrived to the mail based on our domain. For this, you can use any mail client, including our built-in:

As you can see, the letter did indeed arrive according to all the settings. A similar letter should be forwarded to the email specified as the forwarding target in the first paragraph of the article.
Additional settings
Captcha (captcha). To protect against spam, install an additional plugin, for example, reCAPTCHA by Google, and integrate it through the Contact Form 7 settings.
Important: without a captcha integrated into the feedback form, it will definitely become a target for spam bots and various types of malicious activity.
Mail collector. GMail is famous for its strict criteria for accepting mail to its mailboxes, so for 100% deliverability of letters from mail based on your domain to GMail mail, we recommend using the functionality called Mail Import on their side.


