3.4.1 How to create a mailbox, mailbox settings, password change, DKIM
 Creating a mailbox is the first and necessary step for effective email management. In this article, we will tell you how to create a mailbox, configure its settings, change the password, and activate DKIM to improve security.
Creating a mailbox
To start working with mail, you need to log in to your hosting control panel. Use your login credentials, which you can find in the letter about opening the service.
1. In order to create a mailbox, you must have an email domain added. You can add it in the Email - Email Domains section. If the required email domain has already been added, you can proceed to the next step.
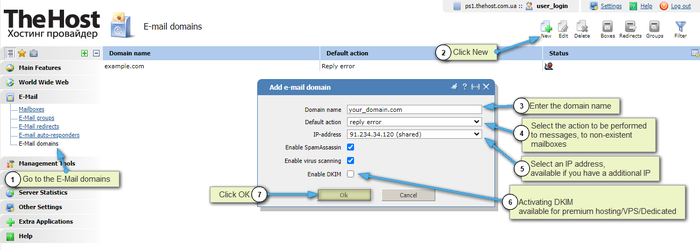
2. Go to the Email - Mailboxes section and click the Create button. Fill in all the details and click OK.
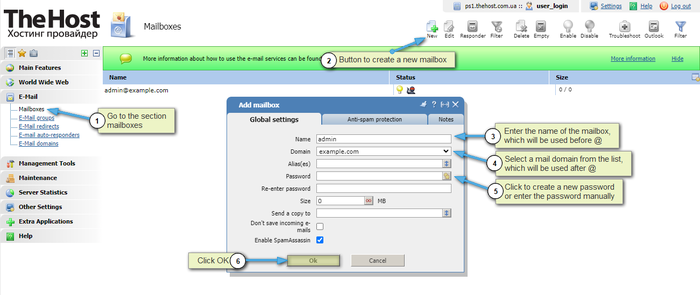
More details: description of the fields when creating a mailbox
| Parameter | Description |
|---|---|
| Name | Specify the name of the mailbox, which will appear before the @ sign in the email address. Use only Latin letters, numbers, signs “-”, “.”. |
| Domain | From the list, select the domain name to use after the @ sign in your email address. |
| Nicknames | Specify additional mailing addresses that will be used for this mailbox. |
| Password | Enter your password to log into your mailbox. |
| Confirmation | Repeat your password to make sure you entered it correctly. |
| Max. size | Specify the maximum amount of disk space that mailbox contents can occupy. |
| Send copies of letters by e-mail | Specify email addresses or local user names to which copies of all incoming messages for this mailbox will be automatically redirected. |
| Do not save to box | Select the checkbox to prevent forwarded mail from being saved in your local mailbox. |
| SpamAssassin | Determines whether the SpamAssassin spam filter will be enabled for this mailbox. |
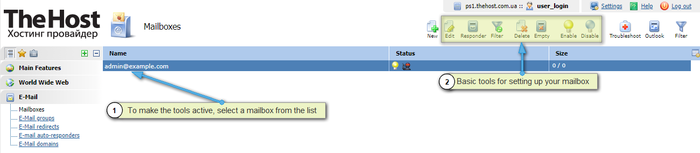
Setting up mailboxes and changing passwords
Setting up a mailbox in the ISPmanager panel includes a number of important options that allow you to customize the operation of your mailbox according to your preferences. Here are the main items available for configuration:
-
Edit: this item opens the mailbox properties, where you can change the parameters of an already created mailbox or change the password. In the mailbox properties, you can edit various settings, such as forwarding addresses, mailbox size, aliases, and other parameters.
-
Responder: this functionality allows you to set up automatic sending of response messages when new emails are received. You can set the auto-reply text and specify the time interval for its activation.
-
Filter: this option provides the ability to configure rules for sorting incoming messages. You can create rules to automatically sort emails into specific folders, making it easier to organize your inbox.
-
Delete: this option gives you the ability to completely delete the selected mailbox.
-
Empty: this option can be used to delete all messages from the selected mailbox and free up space on the server.
-
Enable: this option is intended to enable the mailbox, which will enable it to receive and send letters.
-
Disable: allows you to temporarily disable the mailbox. This can be useful, for example, when there is a temporary lack of need to receive new messages.
DKIM Activation
For premium hosting or virtual/dedicatedservices dedicated) servers you have the ability to activate DKIM (DomainKeys Identified Mail). This method ensures the authenticity of emails. In addition to this important feature, DKIM also improves email deliverability and helps prevent fraudulent attempts to send email using your domain name.
More details: activating DKIM on your email domain

Important: To improve the sender’s reputation and generally guarantee the quality of sending and receiving emails, we recommend that you additionally read article.
On this page

