5.1.3 Configuring PHPmail, Sendmail. Sending Emails via Scripts

PHPMailer is a versatile tool in the world of web development designed for sending emails through PHP scripts. This library provides developers with a convenient way to manage the process of sending email messages, opening possibilities for creating interactive and informative web applications. In this article, we will explore the key aspects of using PHPMailer both in the environment of our hosting and on other services.
Choosing an Email Box for PHPmail
Before running the script, it is necessary to select the sender’s email box that the library will use for sending emails. This is essential to ensure that emails sent by website scripts using PHPmail reach all mailboxes and do not end up in spam. You must specify any existing mailbox created based on your domain.
The process of choosing a mailbox for use in PHPmail differs depending on the mode of PHP operation set for the WWW domain.
1. PHP in CGI mode
To select the necessary email box, go to the PHP configuration section, specifying it in the E-Mail line:
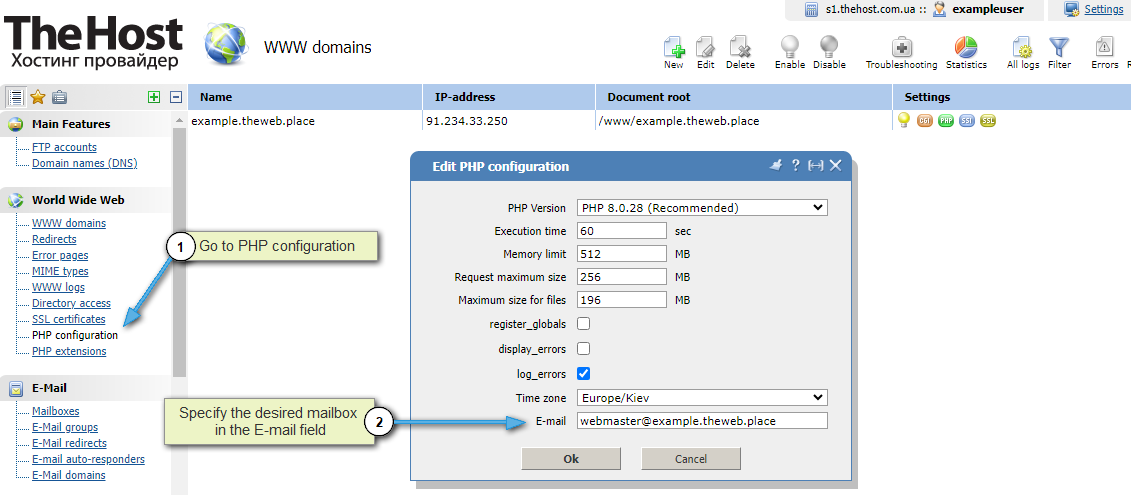
After that, check the changes in the file at the path php-bin/php.ini:
sendmail_path = "/usr/sbin/sendmail -t -i -f mail@exampledomain.com"
2. PHP in Apache mode
To select the required email box, go to the WWW Domains section in the domain properties under the E-Mail administrator field.
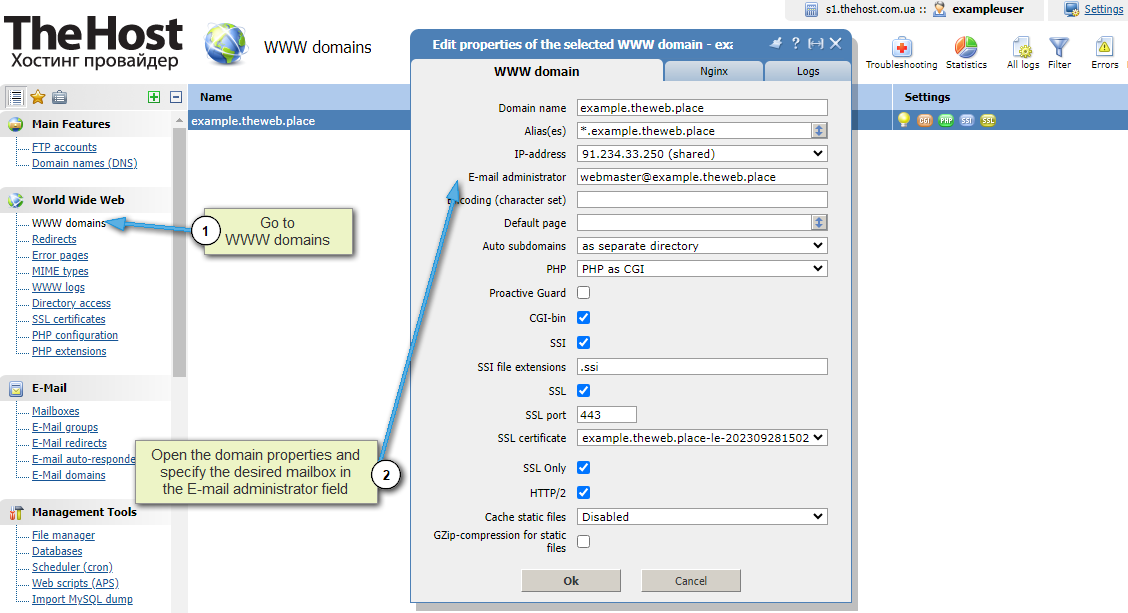
Make sure to specify a genuinely existing mailbox based on your domain. We recommend using a unique mailbox name instead of the standard webmaster@ to avoid potential issues with sending emails.
Note: To use a dedicated IP address for sending emails via scripts, you need to set up this dedicated IP for the WWW domain and the mail domain. Additionally, use the sender’s email created on the mail domain configured with this dedicated IP.
Example of PHPmail script
Often, mass email campaigns are conducted using the mail() function and its derivatives like phpMail. However, not everyone is aware that the mail() function scripts can also harness all the advantages of SMTP, including enhanced delivery reliability and multiple levels of authentication. Below is an example script with SMTP authentication:
// Include the PHPMailer library
require 'path/to/PHPMailer/PHPMailerAutoload.php';

// Create a new PHPMailer object
$mail = new PHPMailer;

// Configure SMTP settings
$mail->isSMTP();
$mail->Host = 'smtp.example.com';
$mail->SMTPAuth = true;
$mail->Username = 'client@example.com';
$mail->Password = 'client_password';
$mail->SMTPSecure = 'tls';
$mail->Port = 587;

// Set email parameters
$mail->setFrom('client@example.com', 'Client Name');
$mail->addAddress('recipient@example.com', 'Recipient Name');
$mail->Subject = 'Subject of the Email';
$mail->Body = 'This is the body of the email';

// Send the email
if (!$mail->send()) {
    echo 'Error: ' . $mail->ErrorInfo;
} else {
    echo 'Email has been sent successfully!';
}
Important: the above example will require your server to have the PHPMailer library. Replace path/to/PHPMailer/ with the actual path to the library on your server.
As you can see, in this script, an existing email address on the server is used as the login.
When using phpMail on our hosting services, SMTP authentication can be performed using a simplified approach, without specifying a password and encryption, and using port 25. The SMTP settings block in this case would look like this:
// Configure SMTP settings
$mail->isSMTP();
$mail->Host = 'localhost';
$mail->SMTPAuth = false;
$mail->Username = 'client@example.com';
$mail->Port = 25;
Checking PHPmail Operation with a Test Script
There is an easy way to verify the functionality of PHPmail and the correctness of the website settings in the hosting control panel.
You need to create a text file mail.php in your website’s folder with the following content:
<?php
var_dump(mail("mail@exampledomain.com.ua","Test","Test"));
?>
Instead of mail@exampledomain.com.ua, specify a working email address to which you have access.
Then, simply open the created file in your browser using the link your_domain/mail.php.
If the script executes successfully, you will receive bool true, and a Test email will be sent to the specified email address. If the script fails, you will get bool false, and the email will not be sent.
In case of failure, try adjusting the website settings according to the recommendations above, and also attempt to change the PHP mode for the site and retry.
Note: If the test script works, but your personal script doesn’t, the issue is not with the domain or hosting settings but rather with your script’s code. In such a case, it is advisable to consult your website developer or web studio for assistance.

