3.2.10 How to install SSL certificate in the ISPManager control panel

Prerequisites for Installing an SSL Certificate
Note: This guide specifically covers the installation of commercial SSL certificates. If you are interested in installing free SSL certificates from Let’s Encrypt, you can find the guide here.
Before installing an SSL certificate, ensure that you have successfully completed the certificate validation and have the following files at hand:
- Certificate: Sent to the administrator’s email after validation. Often named
your_domain.crt. - Certificate Chain: Sent to the administrator’s email after validation. Chain names might differ slightly, typically:
USERTrust_RSA_Certification_AuthorityorCA_Bundle. Sometimes the chain may arrive as two separate files, for example,Sectigo_RSA_Domain_Validation_Secure_Server_CA.crtandUSERTrust_RSA_Certification_Authority.crt. In this case, the actual chain value is the combined content of these two files in that specific order. - Secret (private) key. Generated along with the CSR, at the stage of ordering or generating SSL. This is confidential information that is strictly prohibited from being passed on to third parties.
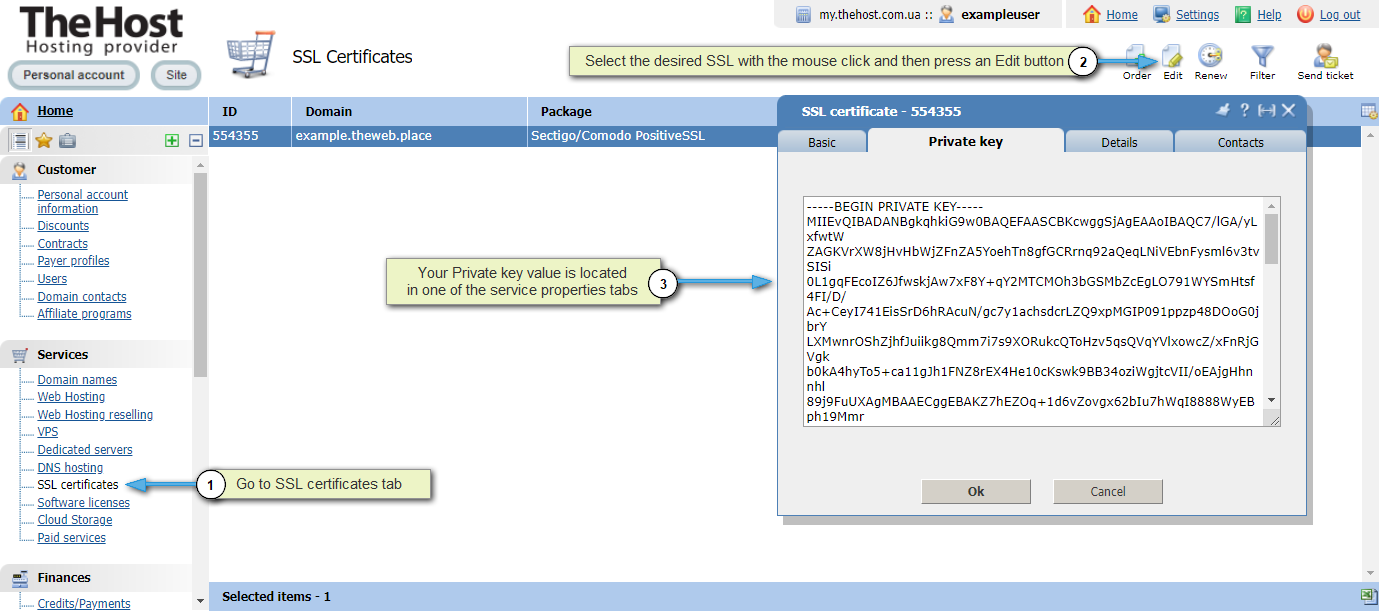
Question: where can I find the secret (private) key of my SSL certificate ordered from TheHost?
If you ordered an SSL certificate from us, you can find the secret key in the billing panel, in the SSL certificates section. Select the desired certificate with a mouse click and click on the top right Edit. In one of the sections of the pop-up window you can see the secret key:
Certificate files might have formats like .crt or .bundle, and Windows might not recognize the appropriate program to open them. Don’t worry, these files can always be opened using any text editor, including Notepad.
If you discover that you don’t have access to one of these files before the certificate installation, double-check your administrator email, and then contact support Service.
Step-by-Step SSL Certificate Installation
Let’s assume you have the certificate files. How do you install and connect them to your website? Let’s explore the SSL certificate installation in detail, step by step:
1. Navigate to the hosting/server control panel. When logging in as a root user, the SSL section will be inaccessible. First, log in as the user who owns the domain.
2. Choose SSL Certificates, located in the World Wide Web section.
3. On the opened page, click New.
4. A certificate creation form will appear. In the Certificate Type section, select Existing.
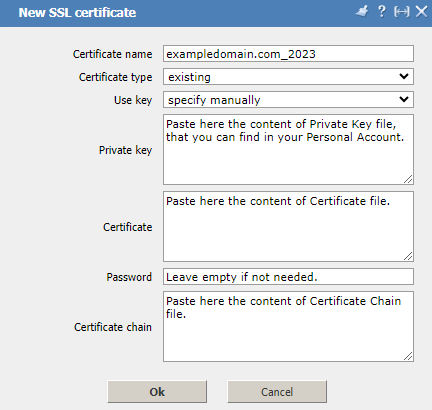
5. Fill in the empty fields with the necessary information:
- Certificate Name – specify the domain name for which the SSL certificate was ordered. This is a technical name and it can be anything, except for the names of already existing certificates.
- Private Key - contents of the private (RSA) key.
- Certificate – contents of the certificate.
- Password – specify a password if you plan to add a certificate with an encrypted key. Usually, this field is left empty.
- Certificate Chain - the certificate chain (ca_bundle) used to sign this certificate. Typically, this chain is included in the email along with the certificate. Otherwise, you can download this chain from the official website of the certification authority that issued the SSL certificate.
Note: Ensure to copy the file contents without spaces, including -----BEGIN CERTIFICATE----- and -----END CERTIFICATE-----.
6. After filling the fields, click Ok. If all the information is correct, the certificate will be successfully created and added to the list under the SSL Certificates tab. However, it still needs to be connected to your website.
Connecting the Installed SSL Certificate to Your Website
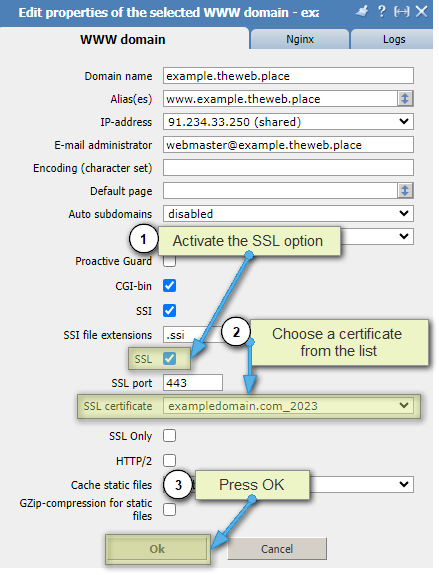
To connect the previously installed SSL certificate to your website, navigate to the WWW Domains section. In your website properties, activate the SSL checkbox, then select your certificate’s name from the list and save the changes by clicking Ok.
If you are installing SSL on a virtual or dedicated server with ISPManager4 panel, you might also need to restart Nginx under the Services tab as the root user to apply the changes.
You can verify if you have successfully installed and connected the certificate using any online checker, for example, at this page.
Enabling Forced Redirect from HTTP to HTTPS
The certificate is installed, connected, and active. How to force redirect all visitors from http:// to https://?
There are two options to enable such a redirect on the web server side.
1. Standard, applicable for all our hosting servers and new OS templates with ISPManager panel:
Additionaly: Enabling forced redirect from http:// to https:// in ISPManager panel.
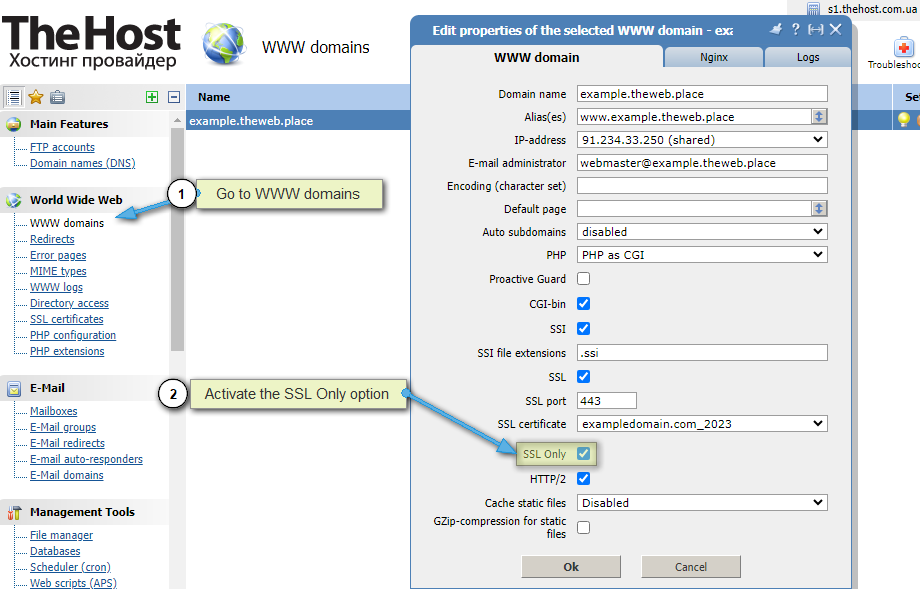
On all shared hosting servers, you can do this in the ISP control panel. To do this, navigate to the WWW Domains section, select the desired domain, and click Edit. Then, in the properties, check the SSL Only option.
2. Manual, when using virtual and dedicated servers with old OS templates (below Ubuntu 18 with ISPManager4 control panel):
Additionaly: Enabling forced redirect from http:// to https:// using Nginx configuration.
You need to add the following block to the Nginx configuration for the specific WWW domain:
    if ($ssl_protocol = "") {
      rewrite ^ https://$server_name$request_uri? permanent;
    }
Here’s an example of how it should look in the configuration file /etc/nginx/nginx.conf/:
  server {
    server_name example.com www.example.com;
    listen 91.234.32.170;
    listen 91.234.32.170:443 ssl;
    disable_symlinks if_not_owner from=$root_path;
    set $root_path /var/www/exampleuser/data/www/example.com;
  if ($ssl_protocol = "") {
    rewrite ^ https://$server_name$request_uri? permanent;
 }
  location ~* ^.+\.(jpg|jpeg|gif|png|svg|js|css|mp3|ogg|mpe?g|avi|zip|gz|bz2?|rar|swf)$ {
    root $root_path;
    access_log /var/www/nginx-logs/exampleuser isp;
    access_log /var/www/httpd-logs/example.com.access.log ;
    error_page 404 = @fallback;
 }
  location / {
    proxy_pass http://91.234.32.170:81;
    ....
Additionally, you can do this on a VPS under root in the WWW Domains section by selecting the desired site, clicking Config in the upper right corner, and adding the necessary code for the site in the Nginx tab.

