3.1.4 How to transfer a website to TheHost

Website Migration – is the process of moving all files, databases, and settings of Your website from one hosting provider to another. This may be necessary for various reasons. For example, You may be changing hosting providers due to unsatisfactory service quality or high cost, or You have a need for more powerful resources for Your growing website. Sometimes website owners want to consolidate several projects under a single hosting account for ease of management, or they are moving to a more reliable or faster platform to improve performance.
A properly executed migration ensures the continuity of the website’s operation and preservation of all its functions. This process requires attention to detail and consistent execution of all steps.
Important: if Your current hosting provider uses the ISPManager control panel, the migration procedure can be performed in a simplified mode using backup, more details in our guide.
Sequence of actions when migrating a website
Preparatory stage
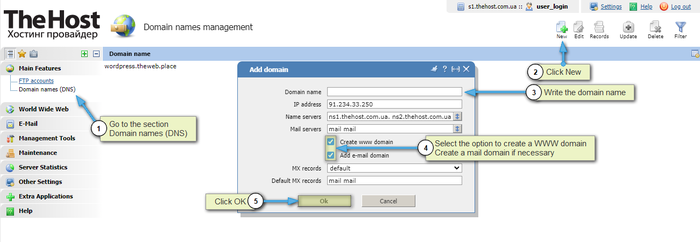
1. Park the domain name on our hosting. Add the domain name to the Domain Names section in the control panel, creating a WWW domain and a mail domain, as shown in the image below:
2. Create a backup of the website on the previous hosting or a backup that includes an archive with all files of Your website and a database dump. You can contact the support to have them do this and provide the archive.
Transferring website files
3. Log in to Your hosting control panel and upload the archive to our server. This can be done in several ways:
- If the website does not take up much space, You can upload it using the control panel.

- If the archive takes up a lot of space, we recommend uploading it using the FTP protocol (for example, using Filezilla or Total Commander), using the access parameters that were sent to You when You ordered the hosting.

4. Unpack the archive using the built-in archiver in the file manager, using the Extract button, or via the SSH protocol.

5. Place the folder with the content in the root of the domain-named folder in the file manager directory (www/Website_Name.com/).

Importing the database
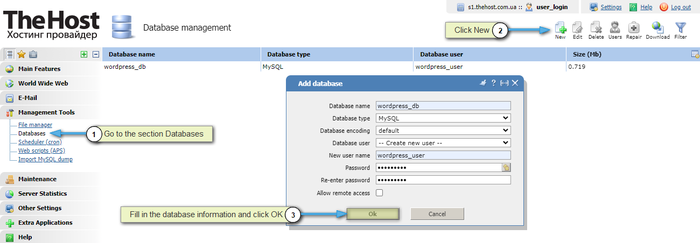
6. In the Databases section, create a new database with a new user and password. The detailed procedure is demonstrated in our guide.
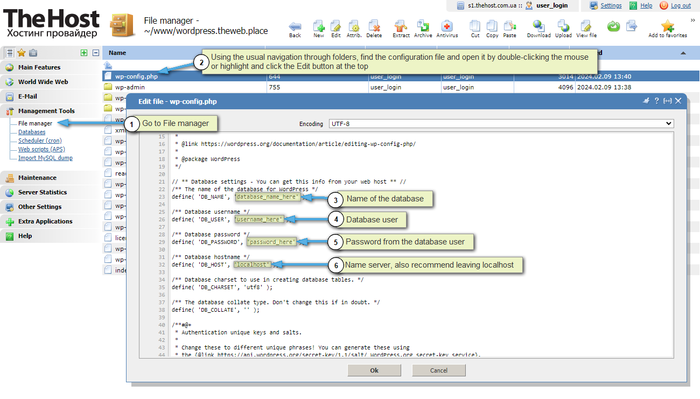
7. Write these new database parameters to the configuration file of Your website (for example, for the Wordpress CMS it will be the wp-config.php file). More details in the guide.
8. Log in with the new login and password to phpMyAdmin and import the database from the dump that You transferred to the hosting backup. The import operation is considered successful if the newly created database in the Databases section has a non-zero size.
You can also use alternative methods to transfer the database, more details in our guide.

Website check and NS forwarding
9. Check the PHP version. The default version may not always be suitable. We recommend checking which version is installed on the previous hosting and setting the same version with us.

10. You can preliminarily check the website’s operability locally, such a check will allow you to make sure that the website is indeed working correctly, and if not - You will be able to fix it. At the same time, the website will still be working from the old hosting globally.
Important: if a message is displayed when opening that the Website has been successfully created, in this case, you need to delete the default index file. How to do this is demonstrated in the guide.
11. Change the NS servers at Your domain registrar to ours.
Informing: the list of our NS servers.
- ns1.thehost.ua
- ns2.thehost.net
- ns3.thehost.biz
- ns4.thehost.pro
Note: changes to NS servers are not instantaneous, you need to wait up to 6-12 hours.
12. After some time, type the domain name in the browser and check if the website is running. If errors occur, we recommend checking the logs.
13. If a security error is displayed, we recommend installing a security certificate. You can order a commercial certificate or use the free Let’s Encrypt.
Informing: to issue a free Let’s Encrypt certificate, you need to wait until the NS servers change and the domain actually starts working with us. That is why you need to connect it only after directing the domain.
Reminding: if you cannot solve the problem on your own, you can contact the Support Service. Our specialists are always ready to help you with any questions related to the migration and configuration of Your website.

