6.4.8 How to enable caching and GZip compression
 When developing and maintaining websites on Linux servers, it is important to pay attention to performance optimization to ensure fast page loading and efficient use of server resources. Two important technologies that can significantly impact website performance are caching and GZip compression.
Caching is a technique used for temporary storage of data or query results to provide fast access to them in the future. In the context of web servers, caching can be used to store copies of web pages, images, style files, and other resources on the server to reduce the load on the server and speed up page load times for users.
GZip compression (or data compression using the GZip algorithm) is a data compression method that allows reducing the size of transmitted files (such as HTML, CSS, JavaScript, JSON, and others), which in turn reduces page load time and decreases network bandwidth usage. GZip compression works by removing redundancy in data and replacing repeating sequences with shorter characters or references to previous occurrences of encountered data. Web servers such as Apache2 and Nginx can support GZip compression to improve website performance by sending compressed versions of files to user browsers. In conjunction with ISPManager4, these settings can be configured to improve the performance of your web server.
Enabling caching and GZip compression using the control panel
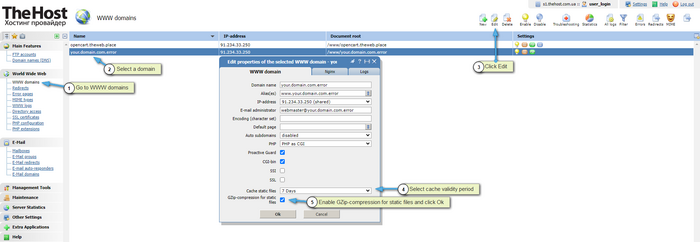
On virtual hosting or VPS/VDS and dedicated servers where Ubuntu 18, 20 is installed and ISPManager4 is used, you can configure caching and compression for your website directly through the hosting control panel. To do this, go to the WWW Domains section, select the desired domain, and click the Edit button. Set the caching expiration period and enable the checkbox next to the GZip compression item.
Additionally: the choice of cache expiration period depends on the specific situation and requirements of your website. Here are some considerations that may help you make the choice.
1. Frequently updated content: if your content is regularly updated and changed, for example, news, blogs, or product catalogs, setting the cache expiration period to 1 day may be preferable so that users always see up-to-date information.
2. Rarely changing content: for static content that rarely changes, such as images, CSS styles, or JavaScript scripts, the cache expiration period can be increased to 7, 14, 30, or even 366 days. This will help reduce the number of requests to the server and speed up page loading for repeat visits.
3. Balanced approach: setting the cache expiration period to an intermediate period, such as 30 or 90 days, may be an optimal solution. This will provide a balance between content relevance and website performance.
4. Individual needs: also, consider the specifics of your business and user requirements. For example, if you have an online store, products may be updated more frequently than blog articles, and therefore, the cache expiration period may be set shorter.
It is also important to remember that an excessively long cache expiration period may result in users not seeing up-to-date content after it has changed, while an excessively short cache expiration period may negatively impact website performance. It is recommended to conduct testing and analyze data to find the optimal solution for your specific case.
Enabling caching and GZip compression on servers without the control panel
For virtual and dedicated server services where the control panel is not used, caching and compression need to be enabled manually. To do this, you need to enter the following lines in the Nginx configuration file (/etc/nginx/nginx.conf) within the server directive for the desired website:
expires 7d;
gzip on;
gzip_min_length 1000;
gzip_proxied any;
gzip_types text/plain text/xml application/xml application/x-javascript text/javascript text/css text/json;
gzip_disable "msie6";
gzip_comp_level 6;
These lines need to be added immediately after the directive:
location ~* ^.+\.(jpg|jpeg|gif|png|svg|js|css|mp3|ogg|mpe?g|avi|zip|gz|bz2?|rar|swf)$ {
Example block with settings in the Nginx configuration file
server {
    server_name examplesite.com;
    listen 91.234.32.170;
    listen 91.234.32.170:443 ssl;
    disable_symlinks if_not_owner from=$root_path;
    set $root_path /var/www/exampleuser/data/www/examplesite.com;
    location ~* ^.+\.(jpg|jpeg|gif|png|svg|js|css|mp3|ogg|mpe?g|avi|zip|gz|bz2?|rar|swf)$ {
        expires 7d;
        gzip on;
        gzip_min_length 1000;
        gzip_proxied any;
        gzip_types text/plain text/xml application/xml application/x-javascript text/javascript text/css text/json;
        gzip_disable "msie6";
        gzip_comp_level 6;
        root $root_path;
        access_log /var/www/nginx-logs/exampleuser isp;
        access_log /var/www/httpd-logs/examplesite.com.access.log ;
        error_page 404 = @fallback;
    }
}
After adding the specified lines, you need to save the Nginx configuration file and reload it with the command:
- service nginx restart
or
- systemctl restart nginx

